Using Variables
Read this excerpt from a guide on variables. You may also choose to watch this video: Arduino - Your First Variables.
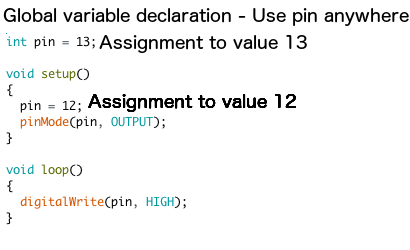
A variable is a place to store a piece of data. It has a name, a value, and a type. For example, this statement (called a declaration):
int pin = 13;
creates a variable whose name is pin, whose value is 13, and whose type is int. Later on in the program, you can refer to this variable by its name, at which point its value will be looked up and used. For example, in this sketch:
.png)
it is the value of variable pin (13) that will be passed to the pinMode() and digitalWrite() functions.
The advantage of a variable in this case is that you only need to specify the actual number of the pin once, but you can use it lots of times. So if you later decide to change from pin 13 to pin 12, you only need to change one spot in the code.
Also, you can use a descriptive name to make the significance of the variable clear (e.g. you could have variables controlling colors called redPin, greenPin, and bluePin).
A variable has other advantages over a value like a number. Most importantly, you can change the value of a variable using an assignment (indicated by an equals sign). For example:
pin = 12;
will change the value of the variable pin to 12. Note that you have to declare a variable before you can assign a value to it, or else you'll get a message like: "error: pin was not declared in this scope".
.png)
Here pin is initialized to 13 when it is declared, but later we assign it to be 12. Thus pin 12 will be the one to turn on here.
A very useful property of variables is that we can increment them by modifying the value. For instance:
pin = pin + 1;
adds 1 to the value of pin. When combined with loops, this allows you to, for instance, turn on all 14 LEDs with just 3 lines of code. We'll cover loops in further detail soon.
Check Your Understanding
1. To create a variable, make a variable such as int pin; or int pin = 13; The keyword int is short for , the type of variable (Google it if unsure).
2. You set the value of a variable by making a(n) , using the symbol : the goes on the left side, and the value goes on the right side.
3. You can modify a variable value by it using a statement such as pin = pin + 1;
Variable Scope
Now what, you might be wondering, did the word "scope" in the error message "error: pin was not declared in this scope" mean?
It refers to the part of your program in which the variable can be used. This is determined by where you declare it.
For example, if you want to be able to use a variable anywhere in your program, you can declare at the top of your code. This is called a global variable; here's an example:
Here, the digitalWrite() function called from loop() will be passed a value of 12, since that's the value that was assigned to the variable pin in the setup() function.
If you only need to use a variable in a single function, you can declare it there, in which case its scope will be limited (local) to that function. For example:
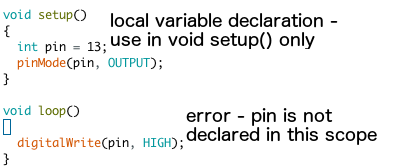
That is, even though you've declared pin somewhere in your program, you're trying to use it somewhere outside its scope.
If you want to know more details, you can read the whole tutorial here.
In general, make a variable local to a function unless you need it to be global. This makes bugs easier to find.
Check Your Understanding
1. Variables have a(n) where they can be used.
2. A variable is created at the start of a Sketch and applies to the entire Sketch.
3. A local variable is created inside of one and creates a(n) if you try to use it elsewhere.
Data Types and Constants
Below is a list of the data types commonly seen in Arduino, with the memory size of each in parentheses after the type name. Note: signed variables allow both positive and negative numbers, while unsigned variables allow only positive values.
- boolean (8 bit) - simple logical true/false
- byte (8 bit) - unsigned number from 0 to 255
- word (unsigned int) (16 bit) - unsigned number from 0 to 65535
- int (16 bit) - signed number from -32768 to 32767. This is most commonly what you see used for general purpose variables in Arduino example code provided with the IDE
- unsigned long (32 bit) - unsigned number from 0 to 4,294,967,295. The most common usage of this is to store the result of the
millis()function, which returns the number of milliseconds the current code has been running - long (32 bit) - signed number from -2,147,483,648 to 2,147,483,647
- float (32 bit) - signed number from -3.4028235E38 to 3.4028235E38. The Arduino is very inefficient when it computes floating point numbers (decimals), so avoid if you can.
The above description was adapted from this website by Mr. Stewart.
Overflow Errors
If you add or subtract from a variable and it exceeds its limits, an overflow occurs and the number wraps around. For example, an unsigned int (aka a word) at its max value (65535) is stored as this in memory :
11111111 11111111
Thus if you added 1 to it, it overflows to 0 (the 1 is carried all the way through and disappears)
00000000 00000000
Similarly, subtracting 1 from 0 overflows to 65535.
Be careful with variable limits. For example, using an integer to delay more than 32.767 seconds will overflow.
Const Keyword (from the Arduino reference)
The const keyword stands for constant. It is a variable qualifier that modifies the behavior of the variable, making a variable "read-only". This means that the variable can be used just as any other variable of its type, but its value cannot be changed. You will get a compiler error if you try to assign a value to a const variable.
Example
const float pi = 3.14;
Using const will save memory (RAM) on the Arduino, which is quite limited. Pins and hardware values can typically be declared const to make your code more efficient.
Check Your Understanding
1. After the following code executes, the value of green will be (use the number). HINT: read the above on overflow errors.
byte green = 0;
green--;  // the decrement operator subtracts ones from the variable
2. To declare a constant byte variable named greenPin and assign it to be 4, use the statement (line of code): (use spacing as above, don't forget your semicolon)