Kivy Example Project
Let’s now create an example Kivy Project on your Linux Workstation! It’ll employ many of the techniques that you used in the Kivy page, as well as some new tips and tricks to make your UIs both more functional and decorative.
First: go through this page to take a look at how to use Kivy on the Raspberry Pis. You’ll likely know some of the information describing Kivy itself, so think of it as a brief refresher.
Now, quickly skim this example project. You’ll be using this project in order to build your first Kivy UI independently! Let’s first check to see whether you have a copy of this repository on your local system – ideally, it should be in the path /home/yourusername/packages/RaspberryPiCommon. If it is not, install the repository at this link: https://github.com/dpengineering/RaspberryPiCommon.
We now need to open the project in PyCharm. Open Pycharm and select open, navigate to RaspberryPiCommon –> PiKivyProjects, click on NewProject, and press OK.
You’ll see three files appear in pycharm – click on main.py. Now, hit the Play button on the top right of your screen to be able to see the results! You should be able to use your mouse to play around with the interface a little bit. This template is exceptionally useful, as it’s the base of basically ALL of the UIs we make here at the Engineering Academy.
There’s a fun functional secret on the page! Try clicking the very bottom of the lower right hand corner of the screen, and enter the password 7266. It’s a manual override contained within all of our UIs as to be able to shut projects down lest something goes wrong.
Instructions
It’s time to try and take a crack at it! Try and use this example UI to complete a series of objectives.
-
Create a button that toggles text between turning a button on and off. wer pressed it.
- Create a slider labeled “position” that, when activated, changes the text on a separate label or position from to 100.
- For reference, here is the Slider documentation.
- Remember the size_hint attribute we discussed earlier? That’ll come in handy for this. It’s not mentioned in the slider documentation, as it’s an attribute inherited from the general widget class, but sliders do strange things with default clickable bounding boxes, and size_hint is often the only way to solve them. Godspeed.
- Create a button that is an image. Have this button transition to a new screen when pressed.
- Use the DPEA Image Button and the Screen Manager. Some information about the Screen Manager: https://kivy.org/doc/stable/api-kivy.uix.screenmanager.html and the reference for the DPEA Image Button: https://github.com/dpengineering/RaspberryPiCommon/blob/master/pidev/kivy/ImageButton.py
Take a break! Smell the roses! You got this.
- Add another image button that’ll transition to the past screen.
Here is a GIF depicting what your UI should look like thus far: 
- Make an animated image button that opens up a new Screen.
There’s one more thing you need to do! But first, some background.
On that note…
The Kivy Clock
The Kivy clock is super useful, but at times can be very fickle. [Here’s] the formal documentation for it.
I think there’s also another important topic to discuss here – threading! This is a little bit more advanced of a topic, so totally optional if you’d like to play around with it.
Clocks
What a clock allows you do to is periodically schedule commands, or even schedule commands once. Calling Clock.schedule_interval(self.kermit, 0.5) in an init function will schedule the kermit function to be called once every 0.5 seconds.
Running code is useful! And surprisingly, there’s very few ways to do so without user input in Kivy without clocks, which makes them very helpful for regular programmatic operations.
A unique gimmick in this is to call a function to update every frame, or as fast as Kivy possibly can. You can do this through specifying a time of 0: e.g., ```Clock.schedule_interval(self.kermit, 0)`` would call Kermit ASAP. Note that our function does NOT CALL self.kermit(): it passes it in as a parameter, which means we do not need brackets.
Clock.schedule_once() is also helpful, as it runs the command passed in once. You can modify when you want this command to execute as well.
Blocking commands
“Parallel” Computing
There’s a lot of verbage here, but I just wanted to make one thing super explicit. All references to threads in this page, and in these documents as a whole, will refer to threads in the context of Python.
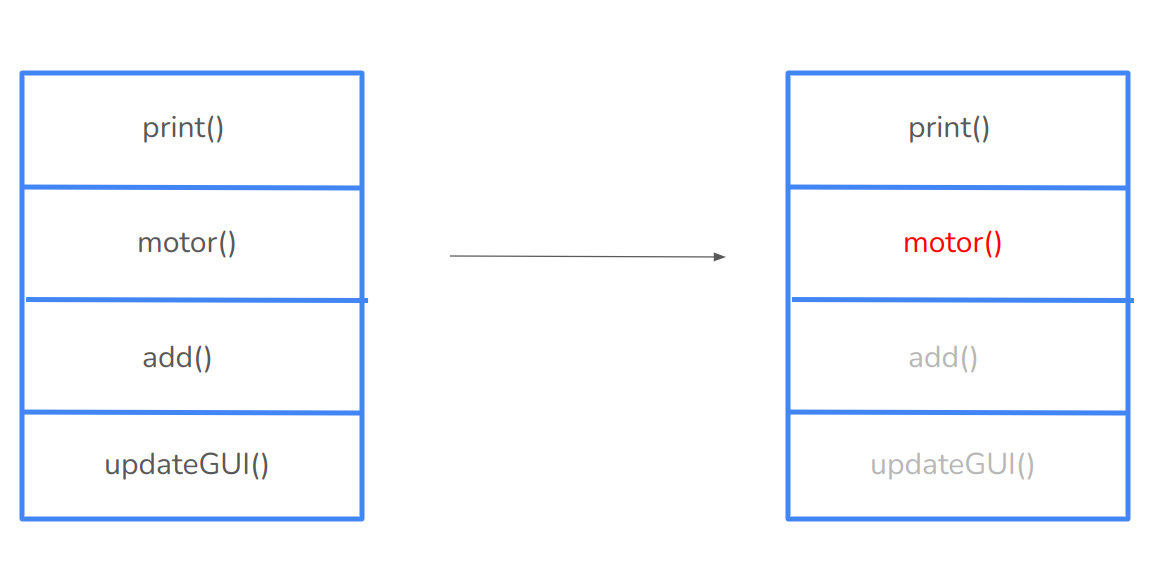
A basic idea of programming languages is the idea of sequential execution. If you call a function x(), then try and call a function y(), y() will only run after x() is completed. The interpreter doesn’t just drop whatever its doing in order to execute y(), it completes its task in the order they were passed in, just like a priority queue.
However, this comes to a head when we run blocking operations. Plenty of things are blocking: running a motor can be blocking, sleeps are definitionally blocking, and a long while or for loop can be temporarily blocking. x() is run, and you try and run y(), but given x() practically never finishes, y() will take a long, long time to actually execute. In the case of Kivy, everything is run as one of these functions. This includes updating frames, which is where our problems arise.
Try it for yourself! Create a new DPEA button which runs a function “waiting” when pressed. Import the time library, and have this button sleep for ten seconds using time.sleep, then print out some text. In those ten seconds, you’ll see that your other button, the king kermit one, cannot update: the sleep in the waiting function is stalling out the other function that’s supposed to update the GUI.
Note that this works because Kivy is operating in what is essentially a massive “while(True)” loop called the event loop. This is shown below:
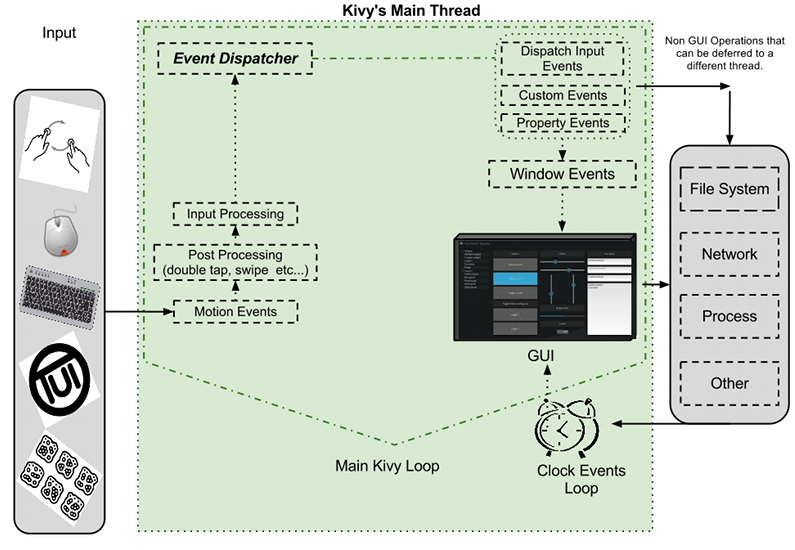
As mentioned earlier, Event Dispatchers allow you to inject some code and inputs into the main loop and achieve the same effect as a sleep, just without stalling the thread. In a majority of scenarios, you should absolutely be using an Event Dispatcher, as they are the built-in solution from Kivy themselves and should be treated as such.
Threading – optional!
There are times, however, in which it’s much, much easier to run a blocking operation – for instance, when running a motor. There, it’s helpful to thread things.
I’m not going to go over concrete code examples because this, once again, is only for exposure into the topic. But what threading allows you do to is simulate multiple flows of execution at one time in order to get around blocking operations. The concurrency class also allows you to do so, just from a higher level perspective, and the multithreading class also achieves a similar purpose. How cool!
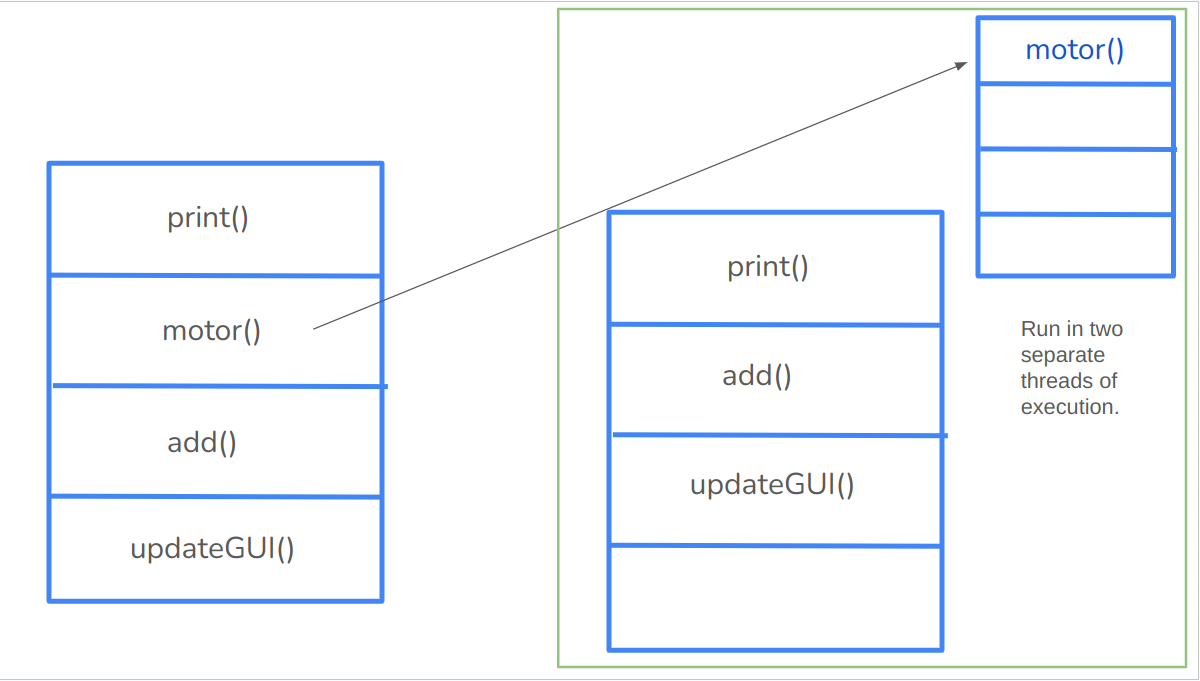
Let’s go over an example. Say you want to run your motors or even sleep while updating the GUI. We run into an issue, which is likely what you saw with the waiting function from above: a blocking process stalls out the rest of the functions in your sequential queue.
What threading allows you do to is, from an abstracted perspective, create an entirely new queue: this is run tangentially, but shares data with the other queue.
Tests^
This way, you can run your motor function in a separate queue from your updateGUI() and other operating functions, which won’t stall them out. How awesome!
If you’re looking for more detailed specifications into threading, including code examples, check out the documentation!
The final challenge
Alright, your last task is more so related to the clock, but I thought threading was a nice interlude here :)
Joysticks
Let’s try and get joystick input to be read on your computer to eventually be served to the Kivy UI.
- Begin by hooking up a USB joystick to your workstation. Ask a DPEA instructor if you don’t have one on hand.
- Next, install pygame. Specifically, we’ll need version 1.9.6, so do so using
pip3 install pygame==1.9.6. If you’re having errors, try the commandsudo apt-get install python3.8-dev python3-dev python-dev libsdl-image1.2-dev libsdl-mixer1.2-dev libsdl-ttf2.0-dev libsdl1.2-dev libsmpeg-dev python3-numpy python-numpy subversion libportmidi-dev libfreetype6-dev - Now, go into a different python file. At the top, import the joystick module using
from pidev.Joystick import Joystick. Create a new joystick object through this command:joy = Joystick(0, False) - Get the x and y position of said joystick through the
get_axismethod – e.g.print(joy.get_axis('x'), joy.get_axis('y'))
Interfacing with the UI
Let’s now try and sync this joystick data with a Kivy UI! Your goal is to create a label that both displays the x and y position of the joystick, as well as dynamically updating its position based on the value of said joystick. This is what that’ll look like:
Some advice:
- Start small! Begin by creating a button that outputs the x and y of the joystick after being pressed.
- Build that up – how do we automate that button press?
Animations (also optional)
Animations used to be a required portion of the DPEA’s instructional documents, but I can’t recall a single project that actually uses one! They do look pretty dope though, so if you’re interested there’s an additional challenge available for you here.
- Make an animated image button that sends you to a new screen. On another screen, add another animated image button that returns you back to main. I’d suggest a simple Sequential expanding and contracting animation, but do whatever animation your heart calls to. Here’s the documentation for creating Kivy animations.